|
|

|
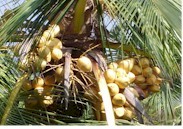
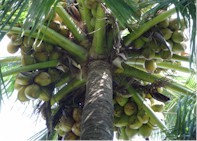
The coconut palm, Cocos nucifera is said to be “Kalpa vriksha” as it’s every part and product is used for various purposes including from consumption to house construction and decoration.The islands have over 25,300 ha. under coconut with an average yield of 92.32 million nuts per year. In the recent years, the country is facing acute edible oil shortage. It becomes necessary to make full utilization of the potential yield of the existing coconut plantations and also to bring additional area under hybrid and high yielding coconut cultivars as the humid tropical climate and the soil of the islands are very much congenial and suitable for it’s cultivation.
Varieties
A. Tall : Andaman Ordinary (A.O.), Katchal Tall (K.T.), East Coast Tall (ECT).
B. Dwarf (sometime referred as King) : Orange (DO), Yellow (DY), Green(DG)
C. Hybrid :D X TD or DY or DG X AO or KT or ECT or T X D or AO or KT or ECT X DO or DY or DG
Climate
Between 200N and 200S latitude. Essentially a tropical plant, Near equator can be cultivated upto 1000 m elevation. Well distributed rainfall of 2000 mm per annum is sufficient.
Soil
Well drained deep sandy loam, alluvial and red loamy soils are ideal. Heavy clay soils and water logged areas should be avoided. Coconut has adoptability to variety of soils.Spacing and requirement of seedlings
| Spacing (Meter) | No. of palms per hectare | |
| Triangular | Square | |
| For dwarf varieties | ||
| 7.5 X 7.5 | 205 | 177 |
| 7.5 X 9.0 | - | 148 |
| For tall varieties | ||
| 9 X 9 | 142 | 123 |
| When intercrops are taken | ||
| 10 X 10 | 115 | 100 |
| 12 X 12 | 80 | 69 |
Method of planting
Half fill the pit of 90 X 90 X 90 cm. size with mixture of silt, sand and farm yard manure or compost or green leaves during March-April.Apply M.P. Dust while planting for controlling termites. Plant 12 months old good quality seedling placing it deep i.e. at 50 cm. depth from top. Make provision for drainage.
Time of sowing/planting
Planting in May-June advisable.
Manures and fertilizers
Add 50 kg. farm yard manure or compost/palm per year during April – May. The fertilizer should be applied in two splits as detailed below (fertilizer g/palm)| Planting year | Premonsoon | Post monsoon |
| ( April-May) | (Oct-Nov.) | |
| N P2O5 K2O | N P2O5 K2O | |
| 1st year of planting | Planting in May-June | 50 30 135 |
| 2nd year after planting | 50 35 150 | 110 60 270 |
| 3rd year after planting | 110 70 300 | 220 120 540 |
| 4th year onwards | 170 100 450 | 330 150 800 |
Interculture
Basin has to be made within a radius of 20 m with proper peripharial bund from the palm before each fertilizer application.
Weeding from the basin and tilling the soil with spade or hand hoe.
Mulching with grasses, leaves etc. during January is advised.
Intercrops and cover crops
First 3 to 5 years crops like Banana, Papaya, Pineapple grows well. Cinnamon, Black Pepper, Clove, Jack fruits are other inter crops recommended in the islands, Grasses like stylosanthes schofield, lemon, vetiver are recommended as cover crops.
Plant Protection Measures
Crown cleaning to be done periodically which other wise is a source for breeding and growth of various insects, fungus etc.
Rhinoceros beetle can be controlled by filling the innermost 2-3 leaf axils of the palm at 2-3 months intervals with M.P 2% dust + Sand in equal proportion. Biological control of this insect with Baculovirus is also very effective.
Provide G.I. Sheet band of 40 cm. wide at 2m. from the ground over the palm trunk to function as mechanical barrier against rats.
Poison bait of zinc phosphide applied at regular interval does help in controlling rat population.
Harvesting and yield
Harvesting is done throughout the year.
Yield varies from 60 to 140 nuts per palm per year depending upon the variety.
Tall variety yield about 60-80 nuts, dwarf about 100-120 nuts and D X T or T X D yield from 120 to 140 nuts per palm per year.
The King of Spices Black pepper (Piper Nigrum) is being cultivated in Andaman and Nicobar Islands in 450 ha. of area with a total production of 85.5 MT. Farmers by adopting scientific management practices can get the substantial income, as Black pepper fetch good price in the market.
Black pepper is the dried matured berry/fruit of the climbing vine. White pepper is also produced from the matured berry by removing the skin and dried to make it more attractive. It occupies an important place in our food as spices and also has a very high export potential. As a aromatic plant it is used as stimulant in cholera, in weakness following fever and as a local application for relaxing sore throats.
CLIMATE AND SOIL
Humid tropical climate with well distributed rainfall, as high humidity is congenial for the crop. An annual rainfall of 2000–3000 cm and a dry spell of 30-45 days before flowering with the onset of rain is ideal for its cultivation. The average temperature of 18o C to 28o C is best suited. Black pepper thrives best on virgin, well-drained soil rich in humus. Pepper is grown in red loam, sandy loam, clay loam and red lateritic sandy clay loam soils with pH of 4.5 to 6.0.
VARIETIES
There are three leading varieties in these Islands namely Panniyur-I, Panniyur-II, and Panchami. Though all the varieties are performing quite well, Panniyur-I is well adopted by the farmers of this island.
Propagation: Pepper is normally propagated through shoot cutting. 2–3 noded cuttings of runner shoots are generally used. The lateral shoots on rooting give rise to bush type black pepper. The runner shoots are separated from vines during Feb-March and after trimming leaves, cuttings with 2-3 nodes each are planted either in nursery beds or in polythene bags filled with fertile soil, so that they would be ready for planting by June-July.
CULTIVATION
Planting: Black Pepper, being a climber needs supporting tree for climbing. Arecanut, Erythrina, Jack, Mango, Silk cotton or any other rough barked tree which does not peal out the bark and which is already available in the garden including coconut can be used as standard for pepper in a mixed homestead farming. Pits of 45 cm long, wide and deep may be made about 60 cm away from the base of the supporting tree on northern side, during Feb-March and filled back with the top soil, dry leaves and compost or farm yard manure. Addition of Organic manure and cattle manure to the pits would develop the basic fertility to encourage quicker growth. The live standards are used at a spacing of 2.7 m x 2.7 m accommodating 2200 vines/ha @ 2 cuttings planted at the base per standard.
Two rooted vines with at least 4-5 nodes are planted at the centre of the pit, in such a way that one node is within the soil so as to facilitate proper rooting in June-July with the onset of monsoon. The vines may be tied to the stakes slanting towards the standard tree.
TRAINING AND PRUNING
As the cutting grows, the shoots are tied to standard as often as required. Pepper plants when young, needs shade either natural or artificial. But too much shade during flowering, defers fruit setting because the raindrops are required to function as the pollinating agent. The young vines should be protected from hot sun during summer by providing shade using coconut leaves. Regulation of shade by looping of branches of the standards, before the monsoon is necessary not only for providing optimum lights to vines, but also for enabling standards to grow straight. Adequate mulch with green leaf should be given (before the monsoon) after digging around standards at 1m radius. It is a good practice to bring down the vines after one year and bend them one round and embed in the soil to provide more root zone and also to lessen the fruiting height.
MANURING AND FERTILIZATION
Manuring the soil around the plants twice a year is a good practice i.e. the first half before monsoon in May and second half after monsoon in October to November. NPK at 100:40:140gm per vine per year i.e. 200 urea, 220 gm Rock phosphate and 230 gm Murate of potash per vine per year may be applied in two doses. The first half in April-May with the onset of Monsoon and the second half in Sept-Oct. The fertilizers are applied at a distance of about 30cm all around the vine and at a depth of about 15cm. The soil is forked in after application. One third of the recommended dose is applied during the first year, which is increased to two-third in the second year, and full dose is given third year onwards. 10 kg of cattle manure compost per vine in May after ¾ years of planting is also recommended. Application of lime @ 500g per vine during April-May in alternate years is also recommended.
AFTER CARE
Carry out digging around the standards and vines at 1m radius from the base or in the entire plantation, twice during the year, the first at the onset of monsoon and the second towards the end of north-east monsoon. Weeding around the plant is to be done according to necessity. In the early stages, the vines are tied to the standards. Lowering of the vines after 1 year’s growth promotes lateral branch production. Intercropping of Pepper gardens with Ginger, Turmeric, Colocacia & Elephant foot, Yam is advantageous. The young plant may be completely covered with dry arecanut leaves, coconut leaves or twigs of trees until summer months are over. Mulching the basins of pepper vines during summer months is highly advantageous. Sawdust, arecanut husks and dry leaves are suitable mulching materials. Removal of unwanted terminals, shoot growth and hanging shoots should be done as and when necessary. Prune and train the standards in March-April every year to remove excess over growth and to give them a proper shape. The effective height of the standards is to be limited to 6m. A second pruning of the standards is done in July-Aug, if there is an excessive shade in the garden. After regular bearing for about 20 years, the vines of most varieties start declining in yield. So under planting should be attempted at about 20 years after planting or when a regular declining trends in yield appears. The old and senile vines must be removed 3-5 years after under planting, depending on the growth of young vine.
DISEASE
For control of disease of Anthracnose spraying with Carbendazim (1 gm per litre of water) is done.
For control of slow decline (slow wilt) apply phorate @ 30gm or carbofuran @ 100gm per vine and earth up, once in May-June and again during October. Ensure soil moisture during and after application. Apply copper oxychloride (4gm/lit of water) also.
For control of foot rot (quick wilt) drench the spot with 4-5 lit of copper oxychloride 50 WP solution (4 gm/lit of water), after removing the infected and dead vines along with root system from the plantation. Avoid replanting in the same year.
To control top shoot borer spray with Quinalphos 25 EC (2 ml/lit. of water) during July-September.
To control Pollu beetle spray with Quinalphos 1.5 ml/lit. of water during June-July and September.
To control leaf gall thrips spray with monocrotophos 36 EC (1.5 ml/lit. of water) on tender leaves.
HARVEST AND YIELD
It flowers during June–July and ready for harvest during December-January, when one or two berries in few spikes turn orange or red. Hand picking is the common practice for harvesting. Berries are separated from the spikes and sun dried for 5-7 days after their separation from the spike by threshing.
To give a uniform lustrous black colour to the finished product and to prevent mouldiness of the berries, a heat treatment is recommended. Suitable quantities of separated berries are collected in a perforated basket/vessel or clean gunny bag. Dip the berries along with the container in boiling water for one minute, take out, drain and spread on a clean surface for sun drying.
White pepper is produced by collecting fully mature berries (yellow or orange), retting them in clear water for 5-7 days for removing the outer skin completely and dry the berries after thorough washing and cleaning. Black pepper starts yielding from third year onwards. The major products are white pepper, canned tender green pepper, and bottled green pepper in brine, dehydrated green pepper, and pepper oleoresin and pepper oil. The average yield per plant would be 5-8 kg of green pepper, which on drying comes to 25% - 30% dry seed.
![]()
Andaman and Nicobar islands has got one of the best tropical and sub-tropical climate with good rainfall which is much suited for nutmeg cultivation. The area under nutmeg cultivation here is 21 ha. with a total production of 31,5000 Nos. of nutmeg. We can very much increase the production of nutmeg by practicing scientific cultural practices and also taking nutmeg as an intercrop in the existing arecanut and coconut gardens. Nutmeg (Myristica fragcans) is the fruit of an evergreen tree reaching a height of about 10 m. It Produces two distinctly different spices – nutmeg and mace. Nutmeg is the dried kernel of seed, whereas mace is the dried aril surrounding the seeds.
CLIMATE AND Soil :
Nutmeg thrives well in warm, humid, conditions in locations with an annual rainfall of 150 cm and more. It grows well up to 1300 m above mean sea level. Clay loam, sandy loam and red laterite soils are ideal for its cultivation. Dry climate and water logged conditions are not good for nutmeg cultivation.
PROPAGATION:
Nutmeg is usually propagated by seeds. Its tree being perennial and dioceious in nature, an alternate method for vegetative propagation is in progress. Epicotyl grafting, approach grafting and patch budding have proved successful in nutmeg. However epicotyl grafting is adopted widely for its propagation for overcoming the problem due to the dioceious nature of the plant.
NURSERY
Naturally split, healthy fruits harvested during June – July are used for raising nursery. The seeds are extracted from the pericarp and sown immediately in sand beds of convenient length, 1-1.5 m breadth and 15 cm height. Regular watering is necessary for good germination. The germination commences from 30 – 90 days after sowing. About 20 days old sprouts are transplanted to polythene bags containing a mixture of top soil, sand and well–decomposed cow dung in 2: 2: 1 ratio. About 18–24 months old seedlings are used for transplanting in the field.
PLANTING
:
The planting in the main field is done at the onset of rainy season. A spacing of 6 – 7 m appears to be adequate. For graft 5mx5m spacing is optimum. Pits of 0.75 m x 0.75 m x 0.75 m size are dug and filled with organic manure and soil 15 days earlier to planting.
The plants should be shaded in the early stages to protect from sun scorch. Permanent shade trees are planted when the site is on a hilly slope when nutmeg is grown as a monocrop. It can best be grown as an intercrop in old coconut gardens, where light shade conditions are suitable. Nutmeg requires irrigation in summer.
MANURING:
Manures are applied in shallow trenches dug around the plants. A dose of 20 gm N (40 g urea), 18 gm P2O5 (100 g rock phosphate) and 50 gm K2O (80 g Murate of potash) per tree per year during the initial year and 500 gm N (1090 g urea), 250 gm P2O5 (1380 g rock phosphate), and 100 gm K2O (1670 g Murate of potash) per tree in subsequent years for a fully grown up tree of 15 years or more is recommended. Manuring twice a year, first in May as pre-monsoon and second in November as post monsoon application.
AFTER CARE:
Nutmeg can be grown as an intercrop in coconut, clove, arecanut & coffee gardens. Regular mulching of plant basins after slashing weeds and shading in summers in the early years are very essential. Banana can be raised for shade in early growth phase of nutmeg 1 m away from it on three sides.
IRRIGATION:
Nutmeg needs sufficient water for its growth, requiring irrigation in summer season.
HARVESTING:
The female nutmeg tree starts fruiting from 6th year onwards. The peak harvesting period reaches after 20 years. The fruits are ready for harvesting, 9 months after flowering. Flowering and harvesting continue throughout the year. But June – August is the peak period. The fruits ripen and become ready for harvesting when their peri-carp splits open. Harvesting is done by a bill hook.
Post Harvest Management :
The fruits are split open, the outer fleshy portion is removed, and the mace is manually separated from the nut. The nuts and mace are dried separatelymace gradually becomes yellowish brown and brittle when drying is completed. The fresh peri-carp can be used for making pickles, jams & jellies.
PEST & DISEASES:
Stem borer and mealy bug infestation can be controlled by spraying with solution of 0.5 ml dimethoate in 1 litre of water.Scale insects can be controlled by spraying with monocrotophos 36 EC (0.5 ml per litre of water.
For thread blight disease prune the affected twigs and dried hanging leaves and spray with copper oxychloride WP (2 gm per litre of water) on appearance of symptoms.
3-7 litre of solution is needed for a tree depending on the size of the canopy.
![]()
Clove (Syzygium aromaticum) of commerce is the dried aromatic, fully –grown but unopened flower buds. It is an evergreen tree grown in our Islands in an area of 95 ha. with a total production of 4.09 MT. Farmers by adopting appropriate management practices can increase the production as our Islands has the hostile climate and soil for clove cultivation.
CLIMATE AND SOIL :
Clove grows well in rich, loamy soil of the humid tropics, with well spread out rainfall. An annual rainfall of 250-300cm is ideal for clove cultivation. They abhor water logging condition, so clay soils in deciduous tracts of these islands are not found suitable due to water logging in the rainy season and the soils becoming too hard in summer. The slopes facing South and west are also not suitable due to severe sun in summer.
PROPAGATION :
The seeds should be collected from fully ripe fruits. Fruits for seed collection, popularly known as mother of clove, are allowed to ripen on trees itself and drop down naturally. Such fruits are collected from the ground and sown directly in polybags or soaked in water overnight. The pericarp is removed befor second method gives quicker and higher germination. Only fully developed and uniform sized seeds which show signs of germination by the presence of pink radicle are used for sowing. Though the ripe fruits can be stored for a few days by spreading them in a cool shaded place, it is advisable to sow the seeds immediately after harvesting. Approach grafting of clove on its own root–stock is successful.
The seeds are sown directly in poly bags filled with soil and cow dung mixture. They should be kept in a cool and shady place. The germination commences in about 10-15 days and last for about 40 days. The germinated seedlings are again transplanted in another polythene bag containing a mixture of soil, sand and well-decomposed cow dung in a 2:2:1 ratio. After one year it is transplanted in a larger polythene bag containing the same potting mixture. The 18 – 24 months old seedlings are ready for transplanting in the field. The seedlings are usually shaded and irrigated daily to ensure uniform seedling stand.
PLANTING :
The pits of 75cm x 75cm x 75cm size are dug at a spacing of 6-7m. If an intercrop, the spacing is to be adjusted based on the spacing of the major crop. The pits are partially filled with compost, green leaf or cattle manure and covered with soil. The seedlings are transplanted in the main field with the onset of rainy season in June-July. Clove prefers partial shade. It is best suited for mixed cropping in older coconut or arecanut gardens, intercropping of banana is very good.
MANURING :
Apply 50 kg farm yard manure or compost and bone meal or fish meal to a bearing tree per year during April-May. Organic manures can be applied as a single dose at the onset of the rainy season in trenches dug around the tree. The application of inorganic fertilizers @ 20 gm nitrogen (40 gm urea), 18 gm P2O5 (100 gm rock phosphate) and 50 gm K2O (80g murate of potash per year per tree) is recommended. The dose can be increased to 300 gm N (600 gm urea), 250 gm P2O5 (1350 gm rock phosphate) and 750 gm K2O (1,250 gm murate of potash per year) for a grown–up tree of 15 years or more. The fertilizers must be applied in two equal split doses in April-May and Oct-Nov. in shallow trenches dug around the plant normally about planted as e sowing. The1-1 ½ m away from the base. The plant basin must be always kept weed free and mulched.
IRRIGATION :
In the first 3-4 years, extreme care should be taken especially during summer months. Plant based water application has to be very judiciously followed.
PLANT PROTECTION :
Seedling wilt can be controlled by drenching the nursery bags with Dithane M-45 75 WP (3 gm/lit of water)
Leaf rot disease can be over come by spraying with copper oxychloride 50 WP (4 gm per lit of water) during June-July.
Stem borer can be controlled by keeping the tree basins free of weeds and by injecting quinalphos 25 EC (4 ml/lit of water) into the bore hole after removing the frass.
For scale insects spray monocrotophos 36 EC (1.5 ml/lit of water).
HARVEST :
Clove trees flower from the fifth year of its planting under good soil and management conditions. But full bearing stage is reached only after 15 years. The flower bud initiation starts from Aug-Sept. The unopened buds are harvested in Dec-Jan, when they begin to turn pink. At this time, they are less than 2cm long. The opened flowers are not valued as a spice.Harvesting should be done using step ladders without damaging the branches, as it adversely affects the succeeding growth.
The harvested flower buds are separated from the cluster by hand and spread in the drying yard for drying. The correct stage of drying is, when the stem of the bud becomes dark brown and rest of the bud lighter brown. Well dried cloves are only one-third the weight of the original. About 11,000- 15,000 dried cloves weights one kilogram. Yield varies from 200 to 500 gm per plant per year.
VALUE-ADDED PRODUCTS :
Clove bud oil is superior in odour and flavour to stem and leaf oil. Bud yields about 17% oil. It contains about 85% eugenol. Methyl–n-amyl-Ketone is present only in bud oil. Its stem has 5-7 % oil containing 70-90 % eugenol. The leaves also have 1.5 – 1.8 % oil. Oleoresin is prepared by cold or hot extraction of the crushed spice using organic solvents. Volatile oil content of oleoresin is usually 70-80%.
![]()
Ginger (Zingiber Officinale) is an herbaceous perennial, the rhizome of which is used as spice. At present ginger is cultivated in these Islands in 390 ha. of area with a total production of 1224.60 MT. Ginger has a distinct flavour and pungency. The productivity of ginger can be increased in the coming years which can in turn add in the economy of the farmers, if they practice their cultivation scientifically.
Ginger grows well in warm and humid climate. Moderate rainfall at sowing time, till the rhizomes sprout, fairly heavy and well distributed showers during the growing period and dry weather about one month before harvesting are optimum requirements for its successful cultivation. Early planting helps in better growth and development of rhizomes and higher yields.
A rich soil with good drainage and aeration is ideal for its cultivation. It grows well in sandy loam or clay loam soils. Drainage is absolutely necessary for the prevention of disease incidence. Ginger should not be grown in the same site year after year.
PROPAGATION
Ginger is always propagated by portions of rhizomes known as seed rhizomes. Seed rhizomes are cut into small pieces of 2.5 –5 cm length weighing 20-25 gm each having one or two good buds. The seed rate varies from 1500-1800 kg per ha. The seed Rhizomes are treated with Dithane M-45 (3 gm per lit of water) for 30 minutes, shade dried for 3-4 hours and planted to control fungal diseases. The seed rhizome bits are placed in shallow pits prepared with a hand hoe and covered with well rotten farm yard manure and a thin layer soil and leveled.
PLANTING
The land should be ploughed 4-5 times to bring the soil into fine tilth. Beds of 1 m width, 15 cm height and 3 m length or of any convenient length are prepared at 40 cm spacing. About 2000 beds of 3 m x 1 m size are prepared in 1 ha. land. Being irrigated crop ridges are formed 40 cm apart. The optimum spacing is 30 cm x 30 cm under bed system of planting. A bed of 3 m x 1 m can accommodate 40 plants.
MANURING AND FERTILIZATION
A basal dose of 25-30 tonnes of FYM alongwith inorganic fertiliser in the ratio75:50:50 kg/ha. i.e. 160 kg urea, 270 kg rock phosphate and, 80 kg murate of potash is recommended for a hectare of land. Whole of rock phosphate and half of murate of potash may be applied at the time of planting. Half of the urea is applied 40 days after planting and the remaining urea and Murate of potash a month after that. Application of neem cake (2 tonnes/ha.) as basal dressing helps in reducing the incidence of soft rot of ginger and increases the yield.
WEEDING AND MULCHING
Mulching enhances germination, increases organic matter, conserves soil moisture and prevents washing of soil due to heavy rains. Two weedings are generally given to the crop. The first weeding is done just before the second mulching and repeated after 15 days depending on the intensity of weed growth. The first mulching is done at the time of planting with 12.5 tonnes of green leaves per ha. and second after 40 days with 5 tonnes of green leaves per ha.
ROTATION & INTERCROPPING
The crops most commonly rotated with ginger are tapioca, chilli, groundnut and maize. Ginger is also grown with maize as a mixed crop and as an inter crop in coconut and arecanut gardens.
It is ready for harvesting in about 8 months, when the leaves turn yellow and start drying. The average yield is 15-30 tonnes/ha.If the crop is for vegetable ginger, it is harvested from sixth month. Rhizomes are washed thoroughly in water 2 or 3 times to remove the soil and dirt and sun dried for a day.For dry ginger, the produce is harvested after eight month and soaked in water for 6-7 hours. The rhizomes are then rubbed well to clean the extraneous matter. After cleaning, the rhizomes are removed from water and the outer skin is removed with bamboo splinter having pointed ends. Only the outer skin is to be peeled as the essential oil of ginger remains near the skin, and dried in the sun for a week. The yield of dry ginger is 19-25% of the green ginger.
PEST & DISEASE MANAGEMENT
Burrowing nematode can be controlled by applying FYM or compost (25 tonnes/ha) or neem cake (2 tonnes/ha) at planting.Shoot borer can be controlled by spraying with the solution of malathion 50 EC (2 ml/lit. of water) during July-Oct at 2 days intervals (4-5 sprays).For control of rhizome scale insect soak the seed rhizome in solution of quinalphos 25 EC (4 ml/lit of water) prior to storage and sowing.For control of rhizome rot treat the seed with aqueous suspension of Dithane M-45 75 WP (3 gm/lit of water) for 30 minutes and air dry before planting. Applying neem cake @ 2 tonnes/ha is also effective.For control of bacterial wilt provide good drainage. After removing infected clumps drench with copper oxychloride 50 WP (4 gm/lit of water) around the affected clump. For control of leaf spot spraying with Dithane M-45 75 WP @ 3 gm/per lit. of water is advisable.
![]()
Andaman and Nicobar Islands being situated in the tropical rainfall belt, agriculture operations in these Islands are carried out under rainfed conditions. Irrigation facilities being limited, paddy cultivation has its own limitations. Proper utilization of land available with the farmers with the value added crop is needed for the improvement of the economy of the farmers.
Turmeric being a value added crop may be cultivated by the farmers on commercial basis. Presently crop is cultivated in a very limited area i. e. 38 ha. with a production of 79.00 MT (approx.)
Turmeric (Curcuma Longa) the sacred spice is used as condiment, dye, drug and cosmetic in addition to its use in religious ceremonies. It is an erect, perennial herb grown as an annual crop.
CLIMATE AND SOIL:
Turmeric prefers a warm, humid climate with a rainfall of 1500 mm and temperature of 200 -30 0 C. It thrives well up to 1200 mm above mean sea level. Well-drained sandy or clayey loam or red loamy soils having acidic to slightly alkaline soil is ideal for its cultivation. It does not stand water logging.
VARIETY:
A number of varieties are available in the locality where they are cultivated. GL-Duram III and CLS 22 are found suitable in these Islands.
PROPAGATION:
Whole or split mother rhizome or finger rhizomes are used for planting . Seed @ 2500 kg/ha .is optimum. Each planting unit consists of bits of 20-25 gm each. The seed rhizomes are treated with Dithane M–45 75 WP (3 gm/lit of water) and malathion 50 EC (4 ml/lit of water) for 30 minutes for storage as well as during the planting time. It is either planted on raised beds of 1 m width and convenient length with 15 cm height or on ridges and furrows. The spacing is kept 30 cm x 15 cm in beds and 40– 60 cm x 25 cm (on ridges or in furrows).. Repeated cropping in the same area should be avoided.
MANURING:
The basal dose of FYM @ 40 tonnes per ha may be incorporated at the time of land preparation. The general dose of fertilizers should be (60:50:120 kg NPK per ha.) 130 kg urea, 270 kg rock phosphate and 200 kg murate of potash per ha. The entire dose of MOP and half of rock phosphate is applied as basal dose. Half of urea is given 45 days after planting & the other half with the remaining dose of rock phosphate is given 3 months after planting. The beds should be earthed up after each fertilizer application. Application of neem cake @ 2 tonnes per ha. at the time of planting helps in reducing the incidence of rhizome rot disease and increasing the yield.
MULCHING:
The crop is mulched immediately after planting with green leaves @ 12000 – 15, 000 kg per ha. It may be repeated for a second time after 50 days with the same quantity of green leaves.
AFTER CARE:
First earthing up should be given after 50 days. It cannot withstand prolonged water logging and also does not tolerate heavy shade.
INTER CROPPING:
Turmeric comes up well under sparse shade also. It can be grown as an intercrop in coconut gardens like ginger or as mixed crop with red gram, chilli, colocasia, vegetables and maize.
IRRIGATION:
Turmeric can be grown either as a rainfed crop or an irrigated crop. In case of irrigated crop, depending on weather and soil condition, 15 –40 irrigations may be necessary at 7– 10 days intervals .
INSECT PEST :
Shoot Borer : The shoot borer is the most important pest of turmeric . The larvae bore into the pseudostem and feed on the growing shoot resulting in yellowing and drying of the infested shoots. The presence of bore hole on the pseudostem through which the frass is extruded and the withered central shoots are the symptoms of pest infestation.
Spraying with malathion 50 EC (2 ml/lit of water) or monocrotophos 36 EC (1.5 ml/lit of water) during July – October at 21 day interval is effective against the pest.
DISEASES:
Leaf Blotch: It is a fungal disease. The disease appears as small oval rectangular brown spots on either side of the leaves.
They soon become dirty yellow or dark brown. The leaves also turn yellow. The yield goes down considerably. For control spray
foliage with Dithane M-45 75 WP (3 gm/lit of water)
For controlling leaf spot give foliage sprays 5-6 times at 15 days interval during June-September with Dithane M-45 75 WP (2.5
gm/lit of water) or hinosan 50 EC (2 ml/lit of water).
HARVESTING:
Turmeric takes 7-9 months for harvesting, drying up of the aerial portion indicates maturity. On an average a yield of 25 – 30 tonnes/ha of fresh rhizomes may be obtained.
POST HARVEST TECHNOLOGY
The harvested rhizomes are washed well to remove adhering soil. The fingers are separated and cooked in boiling water for 1 hour under slight alkaline condition (100 g of sodium bicarbonate or sodium carbonate in 100 litres of water) and sun dried on bamboo. Turmeric is boiled usually in copper/ galvanized iron or earthen vessels. It takes 40–60 minute of boiling to reach the correct stage (soft).
The cleaned fingers (50 kg) are taken in a perforated trough of convenient size made of GI with extended parallel handle. The alkaline solution is poured into a pan so as to immerse the fingers. It is boiled till they become soft. Mother and finger rhizomes are generally cured separately.
The dry recovery varies from 15-30 % depending on variety, location and cultural practices. The dried turmeric is subjected to polishing either manually or by rubbing it on concrete flooring or mechanically in power operated drums. Turmeric powder is added to the drum to enhance the colour of the rhizome. Cured turmeric is screened as finger , round and split.
PRESERVATION OF SEED RHIZOMES:
Rhizomes for seed purpose are generally stored by heaping under shade of the tree or in well ventilated shade and covered with turmeric leaves. Some times the heap is plastered with earth mixed cow dung. The seed rhizomes can also be stored in pits with sawdust. The pits can be covered with wooden planks with one or two holes for aeration.
![]()
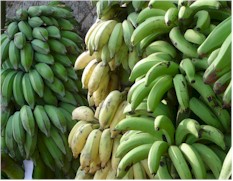
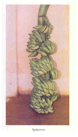
Banana is one of the oldest fruits of the world and in these Islands it is estimated that an area of 1737 ha. of land is under Banana with the production of 12160 MT annually. It available almost throughout the year, the banana is a nutritious, palatable, easily digestable fruit, which is rich in carbohydrates, and minerals.
Soil & Climate
For optimum growth of banana adequate soil moisture with high atmospheric humidity is essential. A well drained deep friable and fertile soil with neutral soil reaction is ideal for banana growth.
Propagation
The banana is commonly propagated by suckers and swords suckers with narrow leaves are preferred over broad leaved water suckers. Rhizome or rhizome bit of 1 kg. weight can also be used for propagation.
Preparation of land
For planting banana pits of 45 cm3 deep are dug and suckers are planted in such a way so that the rhizome is placed 25 to 30 cm. below the surface of the soil.
Spacing and planting
Spacing of 1.8 mt X 1.8 mt. for dwarf Cavendish and 2.1 mt. for Robusta and other tall varieties is recommended.
Fertilizer application
Fertilizers should be applied before planting. For dwarf Cavendish fertilizer dose of 180 gm p2O5 and 200 gm K2O in four split doses at an interval of two months and for Robusta and other tall varieties 100 gm N, 125 gm. p2O5 and 225 gmK2O/plant/year should be applied.
Desuckering
Prunning is the removal of unwanted or superfluous suckers. It is desirable to allow one sucker at the time of inflorescence emergence.
Plant Protection
Diseases
Sigatoka Leaf Spot : Spray of Dithane M-45 (0.25%) and mineral oil 1% gives best control of sigatoka leaf spot.
Anthracnose : For control of anthrachose spray Dithane Z-78 (0.2%), Benomyl (0.1) or Dithane M-45 (0.30%)
Bunchy Top : This disease is caused by a virus transmitted by an aphid.
Control
1. One day before roguing the infected plant spray kerosene oil till it reaches the Pseudostem to kill the aphid.
2. Spray the neighbouring banana plants up to a distance of 50’ with Rogor (0.05%) or Metasystox (0.05%) to kill aphid and avoid spread of disease.
3. (a) Burn and destroy the pseudostem and corn or burry them into a pit.
Insect & Pests
Rhizome weevil :- Application of phorate granules 5 gm/plant has been found to be the best for effective control of this insect.
Harvesting
The bunches can be harvested when the sharp angularities on the fingers start disappearing.
Yield
The yield of banana depends upon factors such as variety, plant density, soil fertility etc. Tall varieties such as Champa yields 15 to 25 tonnes per hectare, whereas Dwarf Cavendish produces 25-50 tonnes of fruit/hectare. In case of Robusta it yield upto 50-65 tonns/hectare
Varieties
 |
Dwarf Cavendish It is resistant to panama wilt. Plants are dwarf and yields heavy with proper manuring. The bunches are large sized (5-25 kg.) compact with good grade of fruit. |
 |
Poovan It is hardy cultivar and withstand adverse climatic conditions. The plants are resistant to panama disease. The bunch is medium to large sized weighing 15-20 kg. The fruits are small and keeps well. |
 |
Robusta It is semitall variety having large and well developed fruits. Fruits retain green colour of rind even when ripe average bunch weight is 30-35 kg. |
 |
Cheena Tall variety well adapted to climate of Andaman produces more suckers, keeping quality of fruits is good. Other varieties grown are - Nendran, Red Banana, Curry Banana etc |
![]()